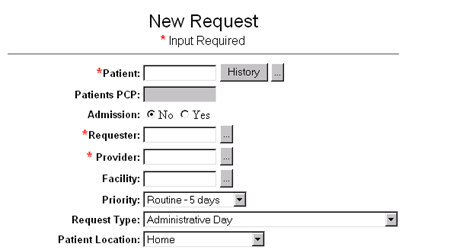
The New Request function lets you enter a new request for treatment authorizations, referrals and/or services. When you click the New Request button, the New Request form appears in the work area of the Main window.
The information below steps you through completing the New Request form.
New Request – screen fields:

* Indicates a required field.
| Field Name | Description |
| *Patient | Click on the button with three dots (…) to the right of the Patient field. The
Patient Search screen appears. You can search for the patient by entering the
Patient’s ID, last name, first name, date of birth, social security number or
any combination and then clicking the Search button. Patient information
meeting the criteria appears. Locate the patient record for the patient you
want and click on the patient’s id.
The patient id you selected now appears in the Patient field of the New Request form and the name appears directly to the right of this field. Those patients that are eligible will be indicated in green and those that are not will be in red. |
| Patients PCP | This field will automatically be populated once the patient information is entered. |
| Admission | Indicate if this request is for an admission by selecting ‘Yes’, the default is ‘No’. |
| *Requestor | Select the name of the person requesting this treatment (physician’s name) from the drop down list. |
| *Provider | Click on the button with three dots (…) to the right of the Provider field to search for the appropriate Provider. The Provider Search screen appears. Search for providers by provider ID, provider name, city or state, specialty or network participation. Once you locate the provider, click on the name to select it. The provider id is automatically entered in the Provider field with the name to the right of this field. |
| Facility | Click on the button with three dots (…) to the right of the Facility field to search for the appropriate Facility. The Provider Search screen appears. Search for facilities by provider ID, provider name, city or state, specialty or network participation. Once you locate the facility, click on the name to select it. The facility id is automatically entered in the Facility field with the name to the right of this field. |
| Priority | Select the priority level to be assigned to this request from the drop down list (i.e., routine, urgent, emergent). |
| Auth Type | Select the type of request from the drop down list (i.e., specialist, imaging, etc.) There is also a Auth Type Guide listed under the Help section which gives examples of what Auth Type to use for certain procedures. |
| Patient Location | Select the patient’s current location from the drop down list (i.e., home, emergency room, etc.) |
New Request – Diagnosis/Procedure screen fields:

| Field Name | Description |
| *Primary Dx Secondary Dx Tertiary Dx |
Enter the appropriate ICD-9-CM diagnosis code for the requested treatment.
Enter the diagnosis code into the appropriate diagnosis field and press tab to move to the next field. The code description automatically appears next to the code number. 1. If you do not know the code, click on the button that contains three dots (…) next to the diagnosis text box. The code search screen appears. You can search by a single word description (i.e. fracture) or a code number. Click on the code you are interested in. The code information appears in the diagnosis field. |
|
Primary Procedure Secondary Procedure Tertiary Procedure |
Enter the appropriate CPT-4 for the requested treatment.
If you know the exact procedure code enter it into the appropriate procedure field and press tab to move to the next field. The code description automatically appears next to the code number. NOTE: If you do not know the appropriate code, click on the button that contains three dots (…) next to the procedure text box. The code search screen appears; follow the same steps as above for the diagnosis. |

| Field Name | Description |
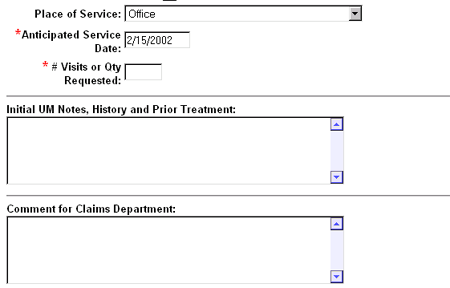
| Place of Service | Enter place of service from drop-down list |
| Anticipated Service Date | Expected treatment date – will automatically default to the current date unless changed. |
| *# Visits or Qty Requested | Enter requested number of visits |
Submitting the Request for Approval
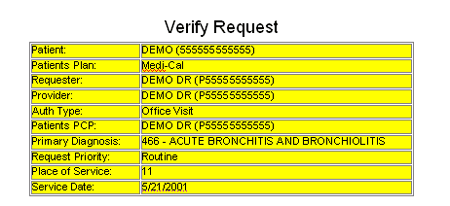
You submit the New Request information by clicking the Next button located at the bottom of the page and verifying the information that you entered is correct in the Verify Request screen.

If everything appears correct, simply click Submit and note the reference number for further follow-up.
New Cases
All requests that you have submitted will appear in the requesting providers inbox. When you click on the reference number, the request will appear in the work area of the Main window.
To redisplay the contents of an inbox, click the appropriate inbox button again, or click your browser’s Back button.
Notifying the Requestor About the Determination
Health Plan of San Joaquin has internal policies and procedure requirements for notifying patients, providers, facilities and agencies about a request determination. Normally, there are three methods used:
Anyone involved with the case (i.e., Physician, Asst. Surgeon, Referred To Physician/Facility, etc.), that has online access to DRE receives online notification of the request determination.
The first column that appears in a providers inbox will display one of the following icons which indicate the status of that request:

Once you have received notification of your request you may acknowledge it by clicking on the checkbox located to the left of patient name and click on the Acknowledge button located at the top of the Inbox. This will remove the request from your inbox for ease of managing. You will always be able to view the request by selecting the Search Requests button.
Searching for Procedure and Diagnosis Codes
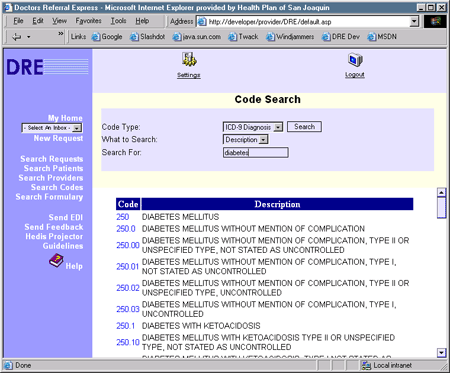
You can find all of the codes used in the DRE software using the Search Codes option.
To access the DRE Search Codes option, click on the link located on the left side of the DRE Main window.

Using the Search Codes option you can find codes based on description or code number.
For example, entering Diabetes in the description field with the ICD-9 Diagnosis option selected, returns codes that range from 250 to 250.93 as well as codes having diabetes anywhere in the description.
When you enter a specific code number in the Code field, the description for that code alone is returned. The code system does not recognize acronyms or abbreviations (i.e., MI instead of myocardial infarction.) The system does recognize partial words as long as it appears within the description text for the code.
Canceling a Case
The only way to remove a case that has been submitted is to cancel it. Only Health Plan of San Joaquin may cancel a request. An external user of the system should open up the case and click on the Add Notes icon located in the icon bar at the top of the screen indicating the reason for canceling the request. A case can be canceled if the patient changes their mind or if the service or treatment is no longer required. Canceled cases must be explained in the case notes and are tracked by the system.